Tuesday, November 25, 2014

DUST Babylon sets shipping

So DUST is one of our favorite games that we play, if you have not tried it give it a shot. On Paolo Parente's Site http://www.dustgame.com/ he has some great pre-painted stuff with premium quality. So for the holiday season it is free shipping on some of these armies and units. Battlefront took over DUST but Paolo still does the premium stuff. Here is a look at the premium Babylon Kickstarter armies that started landing on people's doors these past few days. Keep in mind the Kickstarter backers got a ton of extras.

http://www.dustgame.com/products_d.php?sid=43&id=521

Merry Christmas! Enjoy free shipment with promo code "xmas2014" until 31 Dec.
BATTLEGROUP RED BANNER – BABYLON PATTERN
BATTLEGROUP RED BANNER – BABYLON PATTERNBATTLEGROUP RED BANNER – BABYLON PATTERNBATTLEGROUP RED BANNER – BABYLON PATTERN
BATTLEGROUP RED BANNER – BABYLON PATTERN
 
Item No.
D402A Battlegroup Red Banner - Babylon Pattern
 
Description
The Spetsnaz have arrived! SSU forces won't let North Africa and the Middle East in the hands of German tyrants, reactionary lackeys, American capitalists and international bankers! World Revolution arrives and no-one can stop it! The Spetsnaz are the most famous special forces on the planet and they will fulfill their mission or die trying. Whether you want to start a new SSU army or just expand the existing one in a desert environment, the Battlegroup Red Banner is perfect for you!

This amazing army box includes all the following units:
- Podleytenant (Lieutenant) Vasily Kiritchenko of the Spetsnaz, also known as “Red Banner”
- The “Killers”, a five men Spetsnaz Kill Squad
- The “Saboteurs”, a five men Spetsnaz Saboteur Squad
- The “Steel Wall”, a three men Steel Guard Fire Support Squad
- The “Aleksei”, one KV-47K(Tsh) Light Gatling Walker
- The “Anatoly”, one KV-47L(Tsh) Light Tesla Walker
- The “Iosef Stalin”, one IS-5C Heavy Assault Tank

All the models presented here are shown in Spetsnaz colors, used all around the Middle East, circa Summer 1947. There are two stats cards for each unit, one for Dust Warfare and one for Dust Tactics and Battlefield. Both are for the latest versions of the games and the Tactics cards are V2 ready.

As usual, everything you see on the pictures is there: the weathering, the effects, the crews, etc. Our Studio has done its best to deliver the most amazing painted miniatures.

The Premium Edition models are not just “pre-painted”. What we offer is the exact replica of Vincent Fontaine’s work, Dust Studio’s Master Painter.
 
Size Bookmark and Share
Colour
 
Price(USD) 
$300.00
 
Shipping Charge (USD)
$30.00
Amount Total : $330


Merry Christmas! Enjoy free shipment with promo code "xmas2014" until 31 Dec.
USMC TASKFORCE MACHETE – BABYLON PATTERN
USMC TASKFORCE MACHETE – BABYLON PATTERNUSMC TASKFORCE MACHETE – BABYLON PATTERNUSMC TASKFORCE MACHETE – BABYLON PATTERN
USMC TASKFORCE MACHETE – BABYLON PATTERN
 
Item No.
D504A USMC Taskforce Machete - Babylon Pattern
 
Description
The United States Marine Corps (USMC) has arrived! The Allies are in North Africa and the Middle East for good, and no-one is going to kick these Marines out! The fiercest fighting force on the planet is not easily scared or defeated, there's not much these guys haven't seen already in this war. Whether you want to start a new Allied army or just expand the existing one in a desert environment, Taskforce Machete is perfect for you!

This amazing army box includes all the following units:
- Gunnery Sergeant Q. “Mack” MacDonald, USMC, also known as “Machete Mack”
- The “Saints”, a five men USMC Demolition Squad
- The “Mavericks”, a five men USMC Rifle Squad
- The “Steel Marines”, a three men USMC Heavy Engineer Squad
- The “Mickey (Light)”, one M3A2 Medium Combat Walker – Close Support
- The “Barking Dog”, one M3C Medium Combat Walker - Anti-tank
- The “Devastator”, one M7D Heavy Assault Walker, Phaser

All the models presented here are shown in USMC colors, used all around the Middle East, circa Summer 1947. There are two stats cards for each unit, one for Dust Warfare and one for Dust Tactics and Battlefield. Both are for the latest versions of the games and the Tactics cards are V2 ready.

As usual, everything you see on the pictures is there: the weathering, the effects, the crews, etc. Our Studio has done its best to deliver the most amazing painted miniatures.

The Premium Edition models are not just “pre-painted”. What we offer is the exact replica of Vincent Fontaine’s work, Dust Studio’s Master Painter.
 
Size Bookmark and Share
Colour
 
Price(USD) 
$300.00
 
Shipping Charge (USD)
$30.00
Amount Total : $330


Merry Christmas! Enjoy free shipment with promo code "xmas2014" until 31 Dec.
KAMPFGRUPPE BAUMANN – BABYLON PATTERN
KAMPFGRUPPE BAUMANN – BABYLON PATTERNKAMPFGRUPPE BAUMANN – BABYLON PATTERNKAMPFGRUPPE BAUMANN – BABYLON PATTERN
KAMPFGRUPPE BAUMANN – BABYLON PATTERN
 
Item No.
D306A Kampfgruppe Baumann – Babylon Pattern
 
Description
The Neue Deutsches Afrikakorps (NDAK) has arrived! It's time for the Axis to get their revenge in the sands of North Africa and the Middle East. And the rebirth of the Afrikakorps is the best tool to get the job done. Whether you want to start a new Axis army or just expand the existing one in a desert environment, Kampfgruppe Baumann is perfect for you!

This amazing army box includes all the following units:
- Major Tina Baumann, the head of the Abwehr for the NDAK, and her famous pet Hyäne.
- The “Sand Vipers”, a five men NDAK Battle Grenadier Squad
- The “Sand Lions”, a five men NDAK Tank-hunter Squad
- The “Desert Sun”, a three men Wehrmacht Heavy Flame Grenadier Squad
- The “Leopold Tropical”, one Panzerkampfläufer II-C (Flak)
- The “JagdLuther”, one Panzerkampfläufer IV-D (Tank Hunter)
- The “Stummel”, one Schützenpanzerläufer VI-G (Close Support)

All the models presented here are shown in NDAK colors, used all around the Middle East, circa Summer 1947. There are two stats cards for each unit, one for Dust Warfare and one for Dust Tactics and Battlefield. Both are for the latest versions of the games and the Tactics card are V2 ready. Note that the stats cards for the JagdLuther are now common to the following models of the Axis bloc:
- NachtJäger
- JagdLuther 75
- Snow Lynx
Whenever you field one of the models above, please use the stat card included with this version of the JagdLuther. Consider all models described above as official proxies that are tournament legal when used with this card.

As usual, everything you see on the pictures is there: the weathering, the flame effect, the crews, etc. Our Studio has done its best to deliver the most amazing painted miniatures.

The Premium Edition models are not just “pre-painted”. What we offer is the exact replica of Vincent Fontaine’s work, Dust Studio’s Master Painter.
 
Size Bookmark and Share
Colour
 
Price(USD) 
$300.00
 
Shipping Charge (USD)
$30.00
Amount Total : $330
 

Monday, November 24, 2014

X-Wing Scum adn Villainy Preview

Lethal Ambitions
A Preview of the StarViper Expansion Pack for X-Wing (TM)
X-Wing | Published 24 November 2014
“To contend with Xizor is to lose.”
    –Prince Xizor
In the sixth wave of starship expansions for X-Wing, the galaxy’s Scum and Villainy take to the stars to defend their territory and their profits. They head to battle in starships loaded with illicit tech, and their pilots number among the galaxy’s most skilled and cutthroat mercenaries. Still, these Scum don’t pose a threat to the game’s Rebels and Imperials because of their technology and their mercenaries; they’re a threat that the other factions cannot ignore because their leaders are incredibly skillful and cunning individuals with insatiable ambitions…
For example, the StarViper Expansion Pack introduces the new StarViper-class attack platform, a deadly starship whose story begins with the ambitions of Prince Xizor.

A 360-degree view of the
StarViper-class attack platform
A criminal mastermind and leader of the notorious Black Sun organization, Xizor once numbered among the galaxy’s most ambitious and influential beings. He was cold and calculating, and his rise to power led him over the corpses of numerous enemies. After the Battle of Hoth, his influence rivaled that of even Darth Vader and Emperor Palpatine. 
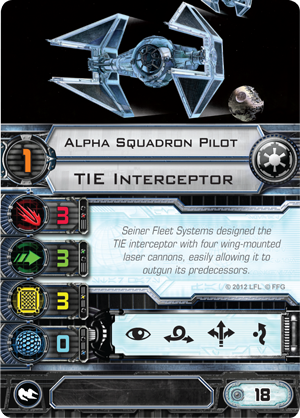
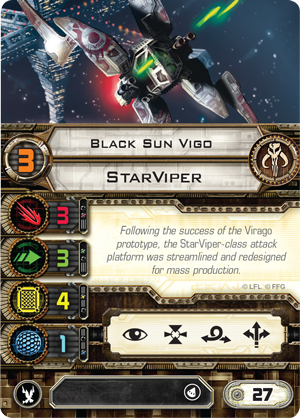
As much as he was known for his cunning, Xizor was known for his extravagant tastes and competitive nature, and it was at his behest that MandalMotors designed the StarViper-class attack platform as a fighter that could rival the Empire’s TIE interceptor in speed and agility.
The resulting prototype easily numbered among the galaxy’s most formidable fighters. Named the Virago, it featured dual laser cannons and forward torpedo launchers, along with wings that could fold closed during atmospheric flight and expand during combat for greater maneuverability. Moreover, Xizor installed an extremely advanced targeting system that greatly increased the efficiency of its weapons. In the end, he was pleased enough with the design that he bought the rights to it, ensuring that his ship would be wholly unique within the galaxy.
Later, MandalMotors reacquired the rights to the StarViper-class attack platform, and though the Virago was too expensive for mass-production, they began producing simplified versions of the craft that used less experimental and sophisticated technology.
The StarViper in Battle
In X-Wing, the StarViper-class attack platform is a highly versatile and potent attack ship.
First of all, it boasts a healthy balance of three attack, three agility, four hull, and one shield. These attributes make it one of the game’s strongest small-base fighters and at a base squad point cost that weighs in significantly below the other small-base fighters that might have an advantage over it:
  • Flown by a Black Sun Enforcer, the StarViper costs only twenty-five of your available squad points, just four points more than an X-wing’s Rookie Pilot, and it comes with one additional agility, plus the boost and barrel roll actions.
  • For seven squad points more than the TIE interceptor’s Alpha Squadron Pilot, the Black Sun Enforcer gains the advantage of one extra hull and a point of shielding; such resilience in a pilot’s ship has often proven the difference between death and victory.
  • Though the Empire’s TIE defender is an even more resilient starfighter, its Delta Squadron Pilot costs thirty squadron points, gaining two extra shield for the five-point difference, but losing the boost action, as well as the ability to fly alongside three wingmates in similar ships.
Second, the StarViper features a fully-loaded action bar that comes with four actions: focus, target lock, barrel roll, and boost.

The
StarViper-class attack platform’s action bar
Finally, the StarViper is an extremely quick and maneuverable fighter, capable of every bank maneuver in the game, along with tight turns at speeds one and two. More important, though, is the fact that the StarViper abandons the Koiogran-turn in favor of the ability to perform the more versatile Segnor’s Loop maneuver.

The
StarViper-class attack platform’s maneuver dial
Unlike the Koiogran-turn, which pilots perform along a straight maneuver template, the Segnor’s Loop maneuver leads a pilot along a left or right bank template before rotating his or her ship 180 degrees. Because each bank maneuver can be mirrored, ships that can perform the Segnor’s Loop gain twice as many options for repositioning themselves at the end of their maneuvers as ships that have to rely upon the Koiogran-turn.
The differences between the Segnor’s Loop and the Koiogran-turn can take on critical importance as a close game draws toward a close and both players’ squads are whittled down to one or two ships. In such circumstances, as starfighters pair off and jockey for shots, the maneuvers of ships that rely upon Koiogran-turns are not only far easier to predict, but they’re easier to block.

In this example, a Rookie Pilot and Black Sun Vigo appear headed toward each other at the beginning of the round. Because the Rookie Pilot’s speed “4” Koiogran-turn would cause its X-wing to overlap the StarViper, the Rebel player has to choose another maneuver.

Caught in a similar situation, though, the Black Sun Vigo is able to perform the Segnor’s Loop, veering either left or right of Luke Skywalker before rotating his StarViper.
With its well-rounded attributes, loaded action bar, and its dynamic maneuver dial, the standard StarViper has everything it needs to spearhead a wide variety of Scum squadrons, but the Virago is even better. A StarViper-class attack platform equipped with the Virago Title gains the illicit and system upgrades for just one squad point. In turn, upgrades like Advanced Sensors and Inertial Dampeners greatly increase your ability to customize your StarViper for use within your squadron.
Prince Xizor and His Bodyguard
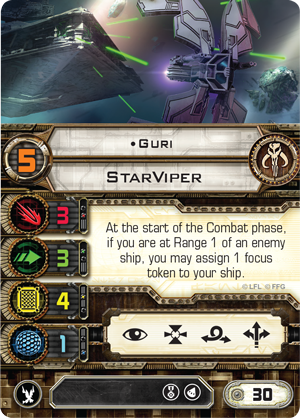
The Virago wasn’t the only piece of unique technology at Prince Xizor’s disposal. His ambitions and his power eventually led Xizor toward paranoia, and he commissioned the design of a human replica droid that could serve him as his second in command, a lieutenant whose loyalty would be entirely beyond question. The result was the creation of Guri, a human replica droid and assassin.
In the StarViper Expansion Pack, Guri appears as a unique StarViper pilot with a pilot skill value of five and a unique pilot ability that fits in perfectly with the Scum faction’s aggressive tendencies:
“At the start of the Combat phase, if you are at Range 1 of an enemy ship, you may assign 1 focus token to your ship.”
As versatile as the focus token that it grants, Guri’s ability can be used to increase the accuracy of her attacks, it can be used defensively, or it can be used in a way that almost doesn’t fit within the themes of the faction. Equipped with the elite pilot talent, Bodyguard, Guri can spend the focus token that she gains to increase Prince Xizor’s agility for the remainder of the round. In this way, the loyal Guri can help protect Prince Xizor, even as he races into Range “1” of his opponents for devastating attacks.

Prince Xizor and Guri form a lethal partnership. Here, Prince Xizor’s
Virago is outfitted with Inertial Dampeners, Predator, and Autothrusters while Guri equips Bodyguard and a Hull Upgrade. Together, they cost you seventy-one squad points, leaving plenty of room in your squad for one or two more ships.
If Guri plays off the Scum faction’s aggressive tendencies, Prince Xizor clearly embodies its self-serving impulses. His ability reads, “When defending, a friendly ship at Range 1 may suffer 1 uncanceled  or  result instead of you.” It also reinforces the idea that the Scum faction doesn’t typically like to fly in formation; though Xizor might like to have wingmates at Range 1, his wingmates might not be so happy to fly so close to Xizor!
Naturally, in an expansion pack featuring the starfighter that he helped design, Prince Xizor also finds some upgrades that can help him survive his battles. For example, Autothrusters are a boon to StarViper pilots and to any other highly skilled pilots who fly “arc-dodger” ships like the A-wing or TIE interceptor. For two squad points, it allows you to convert one blank result to an  result, so long as you’re beyond Range 2 of the attacker or outside of its firing arc.
Hatch Your Ambitions
The StarViper is one of many products born from Prince Xizor’s lofty ambitions, and it will soon give your Scum fleet the cutting edge it needs to take on the Rebels and Imperials.
While you wait for your chance to start flying your own StarViper, join the other members of our community forums to discuss how you would use the StarViper in your Scum squadron.
Then keep your eyes open for more Wave VI news, including a closer look at the M3-A Interceptor Expansion Pack

Saturday, November 22, 2014

Dropzone Commander Update and Quick Batrep

So today I played the intro game of Dropzone Commander with the forces that are included in the starter box. The starter box includes two pretty equal forces of Scourge and UCM They are both divided into three battle groups. My friend Brandon and I laid out the provided battle mat and set up the buildings for terrain. There are three building in the center of the board and each one has an objective in it. Each objective is worth 1 VP and if it is taken off of the board it is worth 2 VP. The rest of the battlefield is littered with buildings. Also if any UCM track vehicles are moving on roads they add plus 2" to their move value if I remember correctly.


Brandon decided to take the scourge and I had the UCM. We reviewed our quick reference sheets that were provided with the box set and rolled our dice to see who decides the turn sequence.

Turn 1

UCM: So I lost the roll and had to deploy first. Brandon and I are used to activation games like DUST tactics so he knew to let me go first on the first turn. I sent my UCM Condor drop ship with three Sabre tanks straight up the middle at full move value.


Scourge: Brandon decided to counter this move with basically an exact mirror move with his own Scourge Hunter tanks in their drop ship.

UCM: I took the Condor with the Rapier AA tanks and deployed them on the right side watching a corridor that had line of sight pretty much all the way down the board.

Scourge: The Scourge deploy their Reaper AA tanks and they move up the middle opposite the center objective behind the center building.

UCM: The last battle group with the Bear APCs and the Legionnaire infantry moves behind a building about 12" up the board but close enough to deploy towards two different building objectives. I wasn't sure which one Brandon was going for yet and I decided to wait until next turn to see which one he was going for and take one of the others.

Scourge: Brandon activated his infantry group moved and disembarked his APCs and moved towards the side of the board that was opposite my Rapier AA tanks which would make perfect sense and net him an easy objective if I couldn't stop him.

Turn 2

UCM: So I win the roll off and I wasn't really in range of anything at this point so I deployed my Sabre tanks from their Condor and moved them towards my left flank where I could start maneuvering towards some targets of opportunity.

Scourge: Scourge Hunter tanks move in and take some shots but luckily form me only one can see my Sabres and he fails to do anything missing his Accuracy roll with a one.

UCM: I move my infantry up in their Bear APCs after they disembark and we both forget that I can disembark from APCs into the building so they sit outside the door with my Condor nearby.

Scourge: The Reaper AA tanks start moving around the center building and are trying to get an angle on some ships but they are short on range.

UCM: I move up the Rapier AA tanks and get closer hoping for some reaction fire next turn. My condor for them moves close to the center since that is where the action will be.

Scourge: The APCs drop their cargo and the Scourge infantry occupy an objective building.

Turn 3

UCM: I win the roll again and I open up on some Scourge AA tanks with my Sabres taking down two of them with some accurate rail gun fire.

Scourge: The fire from the Scourge Hunters target my Bear APCs that are sitting exposed in front of the building. Luckily for me my opponent rolls badly and damages one but fails to destroy the other. Brandon brings his Marauder drop ship around and tries to get another hit on my Sabre tanks but I react with my Rapier AA tanks and blow that thing out of the sky. Luckily I was only about an inch within range but that thing went down before it could do any damage.

UCM: I activate my infantry group in an effort to save what I can. I drop one squad in the center building and I move the other Bear APC towards the a rear building en route to my right flank objective. The Condor moves towards the Hunter tanks but I miscalculate how close I am to the Reaper AA tanks and Brandon pays me back. The Condor takes some serious damage but hangs in with two damage points. This will come back to hurt him down the road.

Scourge: The infantry find their objective load up but sit tight in their drop ship. Brandon decides to keep them hidden for the turn behind a building. He informs me that he is going to wait and just move the full movement value next turn which will take him off the board and secure him his points rather than move the half value and risk some unwanted AA attention.

UCM: The Rapier AA tanks are moved since they already shot and I'm hoping that they can get close enough to get reaction fire on the Scourge drop ship next turn. Their Condor moves towards the middle of the action and takes a shot but misses.

Scourge: The Reapers move into some cover but have already shot their drop ship sits tight with no shot or movement.

Turn 4

Scourge: The Scourge win when it counts and Brandon decides to use his Hunter tanks to take down my Sabres. He opens fire and hits with two. Then he rolls for his energy and only damages one. This is huge and only one tank is removed.

UCM: The Sabre tanks open fire but they focus on the AA Reaper tanks instead of the Hunter tanks. Two of the Reaper tanks are taken down by rail guns and the Sabre tanks move back a little opening up some distance.

Scourge: The Scourge drop ship moves off the board with the objective getting Brandon 2 VP. I tried to react fire but I was out of range by 2". His other APC moves towards the center objective but is out in the open. At this point I am feeling a little behind and I start looking at my other objectives.

UCM: The infantry search the center building and find nothing, the other squad is able to disembark and enter the building while the Condor is feeling a little more secure knowing their is only one AA unit out there. I also decided to take a chance and open fire with my infantry in the building using their missile launchers. They give the APC one Damage Point but its still coming their way.

Scourge: The AA drop ship moves up and opens fire with some wide pattern shots killing a legionnaire.

UCM: The Rapier tanks move forward and secure the rear of the center objective building.

Turn 5

UCM: Infantry search again and on the far right flank they succeed and get into their Bear APC and get picked up by the Condor which starts moving towards the board edge. The other infantry squad fails to locate the objective but remains in the building it fires its missile launchers again but fails to hit the target.

Scourge: The infantry APC moves around the building towards the center objective but fails to get in cover and is left out in the open right next to the door. The full move plus the bonus from their special rule was needed so the troops were unable to disembark from their APC.

UCM: I win the roll and use my Sabre tanks plus the Condor to eliminate all the Hunter tanks. They last one was destroyed by the missiles from the Condor.


Scourge: The last Scourge drop ship tries to get an energy 9 shot on a vehicle but it misses.

UCM: The Rapier tanks move in and I can shoot with two of them at the Scourge APC. I open up and hit but I need to roll 6s with the Rapier to do some damage. I roll one six and that's all I need. The vehicle rolls a 5 on the chart and it is done along with a base from the squad after it rolled on the chart and was destroyed.


Turn 6

UCM: I activate my infantry and the center squad locates their objective. The Condor races off the table on the right flank barely making the leap. But now its 3-2 in my favor.

Scourge: Brandon makes an attempt to shoot up my infantry that have failed to embark in their Bear APC but he just doesn't have enough good rolling to kill them. We call the game at this point and there is not really a way that Brandon can win.


UCM victory 3-2


After Action Review

Brandon: Brandon thought the game flowed very well. He liked the activation phases with the entire battle group going at once. He did not like that he could not mix his AA tanks with standard tanks. I explained to him that with larger games things change with the battle groups. He liked that idea. I was impressed with the UCM armor and he told me that the importance of having AA and using the combined arms of your force was essential.

Robert: I really liked the gameplay and I really enjoyed the rules. I need to read up a little more on the embark/disembark sequence. I feel that I need to get a better understanding of that part of the game. The game was great and I love the minis and I really think I will have to get PHR and Shaltari soon.

Conclusion: Thanks for reading and I can honestly say that this is the best starter set on the market for tabletop war gaming. Definitely a Christmas add on. I will take pics next time.

Sunday, November 16, 2014

Infinity 3rd Edition Army builder coming soon for free

Infinity: Operation Icestorm - Two-Player Introductory Battle Pack (NewArrival)Well I was checking out our friends at Beasts of War and they always have some great information on Infinity and updates concerning the third edition of that game that has really hit the tabletop scene hard with the new starter set. Anyway, here is what Beasts of War had:

November 16, 2014 in Featured, Infinity, SciFi by brennonIn some pretty massive Infinity news from Corvus Belli they have announced that when the next ITS Season begins in 2015 the new Infinity Army 5.0 program will launch with all the profiles for Infinity 3rd Edition, Campaign: Paradiso and Human Sphere. Everything will be updated for the new rules!The biggest bonus of course is that all of this will be available through the Infinity website AND they will all be published for free. We do love free and it’s a massive part of the way Infinity has built itself up over the years.New Profile SamplesTo get you started we’ve got a pair of profiles for you to check out for both the Dasyus from ALEPH and the Makauls from the mighty Tohaa.Download the New Profile Samples – Click HereEffectively Corvus Belli want to make sure that everything will come together and be more balanced and of course updated and competitive for the new season of ITS.Check out the trailer above too! - See more at: http://www.beastsofwar.com/infinity/its-2015-3rd-ed-troop-profiles/#sthash.I7rdDbDM.dpuf

Infinity: N3 Rulebook (Preorder)

 Here is a YouTube link that also has more information on Infinity and their 3rd edition updates that will be free: https://www.youtube.com/watch?v=jOXARru-r4s#t=11

So I think this is the way to go and Infinity is one of the few systems that we see heading this way. I mean free army builders are the way to go. Look at all the X-Wing army builders that are free, or Hawk Wargames and the Dropzone Commander army builder. I love both of those games and I really think some of your bigger game systems would benefit from free army builders.

Friday, November 14, 2014

Star Wars Armada Wave 1 by Fantasy Flight

Here it the first look at Wave 1 releases for Star Wars Armada


News for November 2014
Expand Your Fleet
Announcing the First Wave of Expansions for STAR WARS (TM): Armada
Star Wars: Armada | Published 10 November 2014
“The fleet will be here any moment.”
–Leia Organa
Fantasy Flight Games is proud to announce the upcoming release of the first wave of Star Wars™: Armada expansion packs!
As you launch into Armada and its tactical fleet battles, these expansion packs allow you to customize and expand your fleet. Five of them introduce carefully detailed and pre-painted capital ships, each of which comes with its command dials, ship cards, an array of upgrade cards, and all the tokens and other components you need to deploy it into battle. Meanwhile, the fighter squadron expansion packs each come with eight sculpted squadrons, representing four different types of fighters. You’ll also find eight squadron cards, including one unique card for each type of squadron.
Use these expansions to grow your fleet or to tailor it around your favorite strategy. Either way, these ships, squadrons, and upgrades allow you to explore a vast range of tactics and strategies that reach beyond those available in the Core Set.
Victory-class Star Destroyer Expansion Pack
The largest and most powerful of the starships from the Armada Core Set, the Victory-class Star Destroyer formed the core of the Imperial Navy at the outset of the Galactic Civil War. These ships measure roughly nine-hundred meters in length, sport crews numbering over five-thousand, and feature a dagger-shaped design that allows them to concentrate nearly all their weapons on their forward firing arcs.
The Victory-class Star Destroyer Expansion Pack bolsters your fleet with one sculpted and pre-painted miniature Star Destroyer identical to the Star Destroyer miniature from the Core Set. It also comes with all requisite tokens and command dials, as well as more than a dozen ship and upgrade cards. The expansion’s two ship cards allow you to outfit your Star Destroyer as either a Victory I or Victory II, and its fourteen upgrades open a wide range of strategic possibilities as they allow you to upgrade your armament, your crew, and even your Star Destroyers themselves.
CR90 Corellian Corvette Expansion Pack
The first starship to appear in the classic Star Wars trilogy, the CR90 Corellian corvette is a small capital ship of roughly 150 meters that featured prominently in the Rebellion, largely due to its versatility. Often referred to as “blockade runners,” CR90 corvettes can be outfitted to slip through Imperial blockades, haul cargo, serve as trooper carriers, or engage Imperial ships in battle.
You can add one of these versatile starships to your Rebel fleet with the CR90 Corellian Corvette Expansion Pack. The expansion comes with one pre-painted miniature CR90 corvette, one command dial, all requisite tokens, and ship cards for both the CR90a and CR90b configurations. Additionally, eight upgrades allow you to equip your corvette for battle, including the commander card, Mon Mothma, and the Tantive IV title card.
Nebulon-B Frigate Expansion Pack
The Nebulon-B frigate was designed for the Imperial Navy by Kuat Drive Yards as a warship that could protect convoys from Rebel starfighters, but it was, ironically, a much more impactful ship within the Rebel fleet. At three-hundred meters long, a single Nebulon-B could boast twelve turbolasters and twelve laser cannons.
The showpiece of the Nebulon-B Expansion Pack is its detailed and pre-painted Nebulon-B frigate miniature, and the expansion then enhances this ship by supplying all the command dials and tokens you need to fly it, along with ship cards that allow you to build it into your fleet as a fighter escort or as a powerful support ship. Additionally, the expansion’s eight upgrade cards, which include two unique title cards, allow you to further customize your frigate’s role within your fleet.
Assault Frigate Mark II Expansion Pack
The largest and most heavily armed of the Rebellion’s first Armada starships, the Assault Frigate Mark II is a light warship seven-hundred meters long that sports a crew just under five-thousand and features a considerable armament of fifteen turbolaser batteries, fifteen laser cannons, and twenty quad laser cannons. Designed in secret by Rebel engineers, the Assault Frigate Mark II frequently surprises Imperial admirals with its speed.
The Assault Frigate Mark II Expansion Pack introduces one fully pre-painted Assault Frigate Mark II starship miniature, along with all the command dials and tokens that you need to bring it to battle. Two ship cards allow you to configure your Assault Frigate Mark II to better fit your fleet, and fourteen upgrade cards allow you to further refine its role within your fleet as you select your crew, upgrade your armament, and assign your commander.
Gladiator-class Star Destroyer Expansion Pack
Originally designed as an escort for larger Star Destroyers, the smaller Gladiator-class Star Destroyer measures roughly five-hundred meters and proved most effective as a long-range patrol ship deployed to the fringes of the galaxy. There, its brutal armament of turbolasers, concussion missiles, laser cannons, and TIE squadrons allowed it to quickly subjugate any local opposition to the Galactic Empire.
The Gladiator-class Star Destroyer Expansion Pack introduces one detailed and pre-painted miniature that the expansion’s two ship cards allow you to add to your fleet as either a Gladiator I or Gladiator II. You’ll also find all the command dials and tokens that you need to bring your Star Destroyer to battle, along with ten upgrade cards that can enhance its attacks, allow it to move between attacks, and improve its accuracy.
Rebel Fighter Squadrons Expansion Pack
Even in the largest of battles, a single pilot can sometimes prove the difference between victory and defeat. Some of the most pivotal battles of the Galactic Civil War have been decided by the Rebellion’s courageous starfighter pilots.
Squadrons play an important role in the tactical fleet battles of Star Wars: Armada. Though they’re dwarfed by the capital ships they accompany, squadrons are not to be ignored; swarms of them can take down even the largest of ships. By adding eight squadrons of A-wings, B-wings, X-wings, and Y-wings to your fleet, including unique squadrons led by such aces as Wedge Antilles and Tycho Celchu, the Rebel Fighter Squadrons Expansion Pack helps to tip the scales in your favor.
Imperial Fighter Squadrons Expansion Pack
In battle, the Empire deployed swarms of TIEs to neutralize enemy squadrons and safeguard its larger Star Destroyers and their superior firepower. These easily recognizable starfighters were designed for speed and maneuverability, rather than durability, and the aces who flew them through many battles quickly earned intimidating reputations for their combat skill and fanatical loyalty.
The Imperial Fighter Squadrons Expansion Pack introduces an array of eight starfighter squadrons, evenly split between four different types of fighters. By adding these TIE advanced, TIE interceptor, TIE bomber, and TIE fighter squadrons to your fleet, you’ll be able to swarm your foes, protect your capital ships, and send the Rebellion’s hopes down in flames.
A Fleet to Fit Your Tactics
Build your fleet, refine your tactics, and expand your Armada battles beyond the Core Set and its myriad possibilities with this first wave of expansion packs. All seven are scheduled to release in early 2015, at the same time as the Armada Core Set. Until then, keep your eyes open for more Armada previews, including previews of its fleet-building rules and the different tactical options presented by the Core Set and Wave One upgrades!

Star Wars: Armada is an epic two-player game of tactical fleet battles in the Star Wars universe. Massive Star Destroyers fly to battle against Rebel corvettes and frigates. Banks of turbolasers unleash torrential volleys of fire against squadrons of X-wing and TIEs. As Rebel and Imperial fleets collide, it is your job to issue the commands that will decide the course of battle and, ultimately, the fate of the galaxy.
© & TM Lucasfilm Ltd.

Sunday, October 19, 2014

Dropzone Commander Painting Updates and NIck's UCM almost done...

So the new Dropzone Commander starter sets have been hitting the shelves for about a month now and both Nick and I picked up a box of UCM. We both have the two player starter set and we thought this would be a good way to add to our existing forces. So we started coming up with some schemes and we have previously displayed Nick's UCM on here before so lets show his current project:


So here you can se his tiger stripe pattern really coming together and his force is really starting to gain some character.

Next up I will show you what I have been working on and keep in mind we are beginner painters. I have yet to master the brush and I mainly get table top quality. So for my Condor dropships I went with a grey color scheme reminiscent of the current USMC aircraft:

I decided to pain the canopies black in a sort of high tech HUD or tinted glass version since the sun must be bright when dropping out of space.

The vehicles were a little more difficult to create a camo scheme. Nick and I both wanted some unique camo schemes and this is what I went with:


Its different but similar and it still uses the solid grey that my Condor drop ships have so it keeps in line with the army. I was able to get the UCM starter and the two player starter UCM forces all done except for my infantry. They are primed and ready for some attention so hopefully they will be done soon. Well I hope you enjoy the photos and Nick just bought a Seraphim close support aircraft so that will be getting posted soon. Also we will be highlighting units from Dropzone Commander with some articles on expanding your army. We will start with the UCM and go from there, enjoy.

Sunday, October 12, 2014

X-COM gameplay news

News for October 2014
The Desperate Defense
How to Turn Back the Alien Invasion of XCOM: The Board Game
XCOM: The Board Game | Published 10 October 2014
As their transport rumbled into position, the soldiers locked their armor into place and fired up their battle scanners. One last check of their plasma rifles, and they would rush out the door, into the beating heart of the alien invasion. They knew they wouldn’t all make it back, but if they failed, billions more might die. The whole human race might perish. Live or die, there was no turning back…
Just in case you thought it was going to be easy to win your war against the alien invaders of XCOM: The Board Game, think about this: There are two ways to lose the game, but only one way to win it…
In our last preview, we looked at the game’s free digital companion app. Integral to your XCOM experience, this app allows us to push the game’s design well beyond what would be possible without it. And it coordinates the alien invasion.
There are five different invasion plans, which we’ll explore in more depth in a later preview, but all of them share three common elements: UFOs, enemies, and crises. These are the invaders’ weapons as they strike against you. With these weapons, they hope to sow chaos, topple nations, and cause the collapse of human civilization.
Early military interventions proved ineffectual, and you – and XCOM – are now humanity’s last hope for a successful resistance. It is your job to maintain a semblance of order, to slow the descent into utter panic, and to find a way to strike at the invaders where it counts.
These duties drive the game’s victory and loss conditions:
  • You lose if two continents fall into panic. Not only does this mean that many hundreds of millions of people are dying, it means that your team loses its funding and XCOM shuts down.
  • You lose if your base is destroyed. If your base is destroyed, so are your means of fighting back. And if XCOM can’t fight back, there’s no other power in the world capable of retaliating in any way that doesn’t harm the world more than its invaders.
  • You win if you can unlock and complete your scenario’s final mission. Of course, to get to the final mission, you’ll need to protect your base, prevent nations from panicking, and complete other missions that will help you find weaknesses in the aliens’ strategy.

Can you unlock your final mission? Click on the image above to unlock Domination.
Don’t Panic!
Because you’ll lose if any two of the six populated continents fall into panic, you’ll need to become familiar with the panic track. As you wage your war against the alien invaders, you’ll need to track the degree to which each continent has fallen into chaos.
Time is against you. After all, your team wasn’t fully activated until the world’s military forces had already lost ground to the invaders. Thus, even at the beginning of the game, you’ll find that some of the continents have moved one or more steps along the panic track. Once you start playing, the pressure really starts to build. Each round, the world’s continents each move one step closer toward panic for each UFO in orbit over that continent. As if that’s not enough, the crises you must resolve may also move the world’s continents toward panic.

While XCOM’s Interceptors are deployed elsewhere, two UFOs sow chaos in Australia, moving it two steps toward panic. Asia has already fallen into panic, so if Australia also collapses, the game is over, and you lose!
It’s almost impossible for you to entirely staunch the spread of panic. The best you can hope for is that you can slow it down, aid those nations that truly need your intervention, and buy yourself just enough time to plan a retaliatory strike.
Defend Your Base
As you route your Interceptors across the globe to confront the UFOs that threaten to topple the world’s governments, the aliens send a number of enemies to assault your base, hoping to find some way to eliminate you and the threat that your team represents to their grand design.
In XCOM: The Board Game, there are nine different types of enemy cards, corresponding to each of the different types of enemies that might assault your base. At the beginning of your game, the app will identify a number of these enemies and instruct you to take all of their cards, including any Elite versions, and shuffle them together to create an enemy deck.
These enemies then spawn at your base throughout the game, and if your soldiers can’t eliminate them all, each enemy remaining deals one damage to your base. If your base suffers enough damage, it is destroyed, and you lose.

Two enemies survive XCOM’s defenses, damaging the base twice.
However, your base defense isn’t all-or-nothing. Even if your base isn’t at risk of being destroyed, you can suffer some very real consequences for letting the enemy strike. Whenever the base damage token advances to a red space, you must resolve the damage ability on the aliens’ invasion plan.

The damage token advances to a red space, triggering the damage ability on the aliens’ invasion plan. In this example, two UFOs spawn on each continent in the red zone of the panic track.
We will look at base defense in greater detail in a later preview.
The Final Mission
As UFOs appear in orbit and enemies spawn on your base, you’ll be forced to decide how best to allocate your resources. They are finite, after all, and the key to XCOM: The Board Game is deciding which battles you need to win, and which sacrifices you can afford to make.
As much as this is a game of tense struggles against strange and remorseless foes, it is a game of resource management. Interceptors cost money. Soldiers cost money. Scientists cost money. Satellites cost money. And your funds are limited. You need to weigh your options clearly and quickly, even in the face of disaster.

Your team has thirteen credits… You need to make them count!
But if you can help the world’s governments retain a semblance of order long enough, and if you can keep the enemies from destroying your base and all your work, you just might be able to send a hand-picked unit of soldiers to undertake one final, surgical strike against the aliens that may hit them hard enough that you can turn the tides of war.

XCOM’s squad leader sends a squad of two assault soldiers and one sniper to attempt the game’s final mission. Both types of soldiers excel at the early tasks, though they may need to push hard to make it through the mission’s third task.
Moreover, you can undertake other missions throughout the game to find weaknesses in the aliens’ invasion plan. By completing these other missions, you reduce the amount of time it takes your analysts to discover the target of your final mission.
Both these preliminary missions and the final mission require that you complete a number of tasks, but there’s certainly no guarantee you’ll resolve them successfully on the first attempt, nor on the second, or the third. In fact, there’s a good chance that when you send your best soldiers to a mission, you’re sending them to their doom.

Open task slots on missions are filled by enemies. Completing this final mission requires that you get one success on the first task, then get three successes on the second task, and finally manage to get one last success on the third task.
Prevail Against Overwhelming Odds
The odds of XCOM: The Board Game are stacked against you. There are two ways to lose and only one way to win. By the time your team gets funding, the aliens have already launched their invasion. You need to fight your war on four fronts, but you don’t have enough funding to fight on even footing at each.
Out of this situation, you must carve a winning plan. You need to shoot down UFOs to slow the rise of panic. You need to fight for your base. You need to research new tech to gain footing. You need to send soldiers on deadly missions to gain crucial military intelligence. It’s a desperate situation, and it requires bold action. The question is: How far will you push your luck?
In our next preview, we’ll look at the game’s push-your-luck dice mechanics in conjunction with your base defense, the role of the Squad Leader, and the resolution of missions!

XCOM: The Board Game is a cooperative board game of global defense for one to four players. As unknown alien invaders press their attack against the earth, you and up to three friends serve as the department heads of XCOM, an elite, international military organization. You must destroy UFOs, research alien technology, complete critical missions, and find some way to prevent the collapse of human civilization. You are humanity's last hope.